Soundhole Rosette 4
Step 11 - Applying lines to the outer edge
Do some complicated maths or simply wrap a bit of string around the outside of the rosette to get a minimum length for the circumference and then cut some strips of veneer about 2mm. wide.
For this one I have selected a dark brown (bubinga),a white (holly) and black (ebony) - the holly is a bit thicker than the other veneers.

The first line is going to be Bubinga and I am fitting it using Titebond and small map pins to hold it in place.
I have placed waxed paper underneath the rosette which is clamped to a bit of fibreboard.
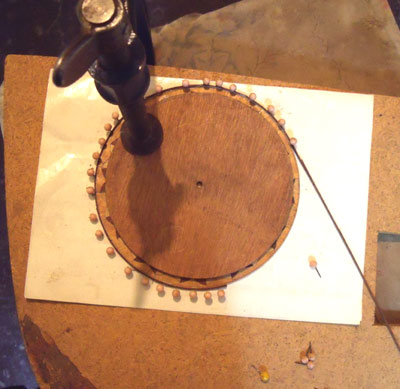
Keep the veneer strip tight to the rosette as you make you way round.
When you get near the end try and cut the end to be the exact length to fit.
I randomise all the joins in the strips so they can be anywhere in the circle but not too close to each other.

Having glued the first line with Titebond I now move on to superglue for fixing the remaining lines.
I use a small brush to apply a bit of water to the two sides to be joined then drop a small amount of superglue - let it run
into the narrow end where the veneer strip is already joined and then press it together using waxed paper between my fingers
and the glue joint.
Hold for ten seconds and the bond is achieved.
Superglue will glue slightly damp wood much better than it will dry wood - contrary to most good gluing practice.

Five lines in all here;
Brown · White · Black · White · Brown
Step 12 - Making good the inner edge

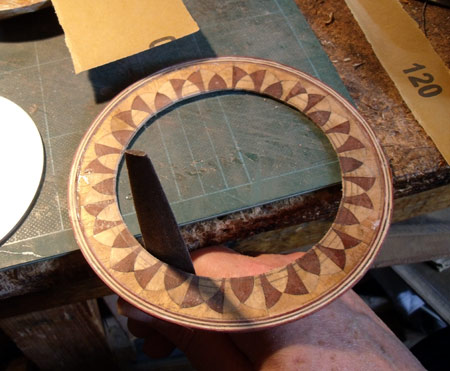
Using a fretsaw to cut just inside previously drawn line

Centre removed - keep a piece of the removed bit as it may come in handy for judging the depth of the hole we will make to inlay the finished rosette
We now have to file or sand right up to the line.
I use a half-round file that has an almost perfect curve for the job.
At the beginning of this process I will wrap sand paper round it.
You could also use any round shape such as a rolling-pin,jam-jar,beer can etc. with sandpaper wrapped around it.
Just accurately remove any material inside the line.

Sanding finished - ready for inner lines.
Add the lines to the inside edge in exactly the same way as the outside edge

Use a cabinet scraper to flatten all the lines down to the level of the rosette veneers - try not to scrape the actual rosette at this stage.
Do the same to the back - nice clean wood is also required to get a good glue joint at the installation of the rosette into the soundboard.
Step 13 - Fitting the rosette to the guitar top
Firstly I finish the soundboard in terms of sanding ending with 600 grit.
I then brush on some cellulose Sanding Sealer - this protects the spruce top when fitting the rosette.
I use a router to cut a recess in the guitar top - I place a pin screwed through the top into a backing board where I want the centre of the rosette to be.
I then attach my routing jig to this pin and carefully expand the diameter until I reach the exact size required.
The part of the top inside the inner lines of the rosette is not removed
as this will help to keep everything flat when leveling the rosette.I have
done this with the router by hand which is why it looks so messy (it will
be removed so doesn't matter ).
Glue the rosette in place using Titebond ,waxed paper,cauls either side and plenty of clamps.

Leave to dry for 24 hours then use a cabinet scraper to level the rosette and remove the layer of glue, dirt etc. from the top of the veneer.
It is desirable to use a scraper rather than sanding as scraping just removes
a thin layer of wood fairly cleanly whereas sanding tends to force dark
coloured wood dust into the grain of the light coloured woods and thus "muddy"
the final design.

Use either a compressor or vacuum cleaner to blow or suck any dust off the design and then brush on sanding sealer.
Let dry and repeat as many times as necessary to fill all the pores,joins and cracks.

I then cut out the actual sound hole using the fretsaw and accurate sanding technique.

The finishing touch to the rosette is to put a final veneered line inside the soundhole to the full depth of the soundboard - I am using ebony for this one.
This helps to protect the edge of the rosette and seals off the endgrain of the spruce top.
I will then leave the rosette as it is until the final stages of finishing the guitar when it will be sanded flat prior to lacquering.
The Finished Article


© Nick Marchant Guitars